Trying to make sense of when to use Docker vs. LXC

While working on some side projects the past couple weeks I kept confusing myself on how things worked behind the scenes between Linux Containers and Docker. They both leverage the Linux kernel’s cgroups to function on Linux (and in Docker’s case - similiar technologies in other OSes), but differ completely in terms of how you interact with them.

While Linux Containers can best be thought of a super lightweight VM to run a whole VM, Docker contains a slew of other features that blur the lines between it acting like a super lightweight VM and being a full platform to build off of. Docker plays closer to the idea of a process/group of processes (application) under a chroot versus LXC’s idea of a whole OS/machine in a chroot jail.

So it’s misleading to think of a Docker container the same way as a LXC container. Same technology behind the scenes but completely different approaches. For Docker it’s all in how you set up your container to run - you can have all the other services you normally get in a VM if you so wish.

For example with LXC setting up MySQL would consist of making the container, running the command to install MySQL and setting the service to go. You can then log in or attach and run other commands as well if necessary.

Docker on the other hand involves similar steps with the flexibility of having Docker do the install and run the service when the container starts (defined in the Dockerfile). However if you want to attach to that container and run more commands you have to have set access to do that up ahead of time (eg. supervisord, runit), create a new container with that command, or try and force your way into the container. (you can try lxc-attach but if you want a new TTY and you’re attaching to a mysqld instance? Not going to work)

After figuring that out - the use of Puppet in Docker started to make more sense. Have Puppet configure your image and then save/commit that state or kick off the supervisord process to keep the container “alive”. Docker lends itself more to recreating/iterating whenever a new update is needed over updating settings.

In summary - LXC container is analagous to a VM, while Docker a very supercharged sandbox for running a process or group of processes. Use LXC when you’re wanting a separate “server” without the extra overhead, Docker when you’re wanting to run a “service”.

I also recommend reading the FAQ - primarily the what Docker “adds to LXC”. In the end it’s left me more leery of using Docker - it’s a bit of a paradigm shift I’m not ready to do just yet.

On one last sidenote, IPv6 support also looks like a lot of pain - but not any worse than LXC.

About Me

I am a Technical Operations Manager at Cybera by day, a geek, father, and husband by night. My current role grants me a great deal of freedom to try out various different solutions both as a learning exercise and as a way to improve how things run. I’ve used the pseudonym Chealion online since 1998 and have subsequently owned and posted content on chealion.ca off and on (more off than on) since 2006.

I’m writing this for myself so I apologize in advance if you find it not very focused.

You can get contact me by emailing me chealion AT chealion DOT ca

Other haunts:

Github
Flickr
Mastodon


Moving to Ghost

Alongside changing hosts (moving from TextDrive to my own VPS), adding IPv6 support for my websites and taking far too long to do it I’ve also swapped WordPress for Ghost. Slightly involved installation but much nicer. Most importantly no comment spam.

Using Gmail as your SMTP server When Using your ISP's Email

NOTE: You’re going to be using Google’s service to send the email but for all intents and purposes it’s completely transparent to both you and your recipient. It’s also a world lot better than using some random SMTP server (having to find out the local one and always change it) or finding all your email you sent doesn’t even arrive in your recipient’s inbox because it’s been marked as spam because of the server used. I’d recommend looking for an IMAP host instead for the long run.

For brevity I’m leaving out the exact steps to hook this up with your favourite mail client but you can find that out fairly easily as it’s only changing the SMTP server (or check my post about setting up Shaw’s SMTP service) and change mail.shaw.ca to smtp.gmail.com and using your Google login instead of say Shaw’s in the section about changing your SMTP server).

  1. Set up a Google Account. If you have one you’re good to go.
  2. Log into Gmail
  3. Go to Settings (link is in the top right)
  4. Go to Accounts and Import
  5. Under “Send mail as:” section click “Send mail from another address”
  6. Enter your email address you want to use (eg. [email protected]) and press Next
  7. Choose to use Gmail’s servers, press Next and choose Send Verification
  8. Click on the link in the verification email. This will verify the email address so you can move onto step 9. You may need to check your Junk Mail folder.
  9. Back at the “Send mail as” section (you may need to refresh the browser) click the “make default” link for the email address you set up and be sure that below it “Always reply from default address” is selected.
  10. Now be sure to change your SMTP settings on your computer/mobile device accordingly. This varies from device to device as to the steps but is the most important step. If not set correctly (eg. not turning off other SMTP servers on an iOS device) will make everything we’ve done for naught.
  11. Send an email to yourself to test and reply to it and make sure it gets to the right address. The only times I’ve ever seen an error here is if the SMTP wasn’t set up correctly, step 9 wasn’t followed or the carrier’s SMTP server was enabled again (yes it’s repeated because it accounts for 99% of errors I’ve seen).

Not difficult, but something I can grab when writing an email on how to do it. :-)

Hooking Up with Shaw's New "Remote SMTP" Service

Update (February 2012 - Webmail 2.0 is completely up with all it’s Exchange goodness - so check out Shaw’s new instructions )

Please join me in welcoming Shaw’s new feature of actually allowing Shaw email users to send email while travelling without resorting to webmail or trying to find the local ISP’s SMTP server address (or seeing that Telus’ mobile SMTP server is blacklisted AGAIN marking all your email as spam). This is of course ignoring that I don’t recommend anyone actually use their ISP provided email address but instead use something a bit more dedicated like your own domain or an actual email service. It’s still better than an AOL address.

Previously I’d been setting clients up to use a Gmail account as their proxy sending address when they have a Shaw or Telus email address - this makes it easier for Shaw clients. It’s also a lot simpler than the Gmail approach (which I have yet to post here).

Coles Notes

  1. Turn on Mobile Access using the new Webmail beta: https://wmbeta.shaw.ca
  2. Change your SMTP settings to point to mail.shaw.ca using port 587, STARTTLS, and use your username and password as the authentication

More elaborate instructions

Setting Up Shaw’s End:

  1. Sign into https://wmbeta.shaw.ca
  2. Click on Preferences (right side of screen - it’s a text link beside Feedback)
  3. Click on the ‘tab’ that says ‘Mobile Access’
  4. Set it to Enabled (click the radio button beside it)
  5. You may need to change your password to meet their new security requirements.
  6. Press Save. It will say “Preferences saved” in a small yellow box at the top of the page if it’s successful.

Thunderbird:

  1. Go to the Tools menu and choose Account Settings
  2. On the left side on that window click on “Outgoing Server (SMTP)”. You may need to scroll as it’s always the last item.
  3. There should be an item associated with the Shaw account you just turned on. Whichever account you turned on Mobile Access for and click on it and then click the button that says “Edit…”
  4. In the window that appears change the server name to mail.shaw.ca instead of shawmail or shawmail.cg.shawcable.net that it was set to. The port number should be changed from 25 to 587 and the Connection Security to STARTTLS. Authentication: Normal password and then enter your username
  5. Press OK
  6. If you did not change your password when setting up Shaw then press OK and you’re done. If you did change your password when setting up Mobile Access the next time you check email it will ask you for a new password and you can enter it.

Mail.app:

  1. Go to the Preferences and click on the Accounts section
  2. Click on your Shaw account on the left side
  3. Where it says Outgoing Mail Server (SMTP): click on the drop down menu and choose “Edit SMTP Server List”.
  4. Find the Shaw SMTP server in that list and click on it.
  5. Change Server Name to mail.shaw.ca
  6. Click on the Advanced tab
  7. Check off Use Secure Sockets Layer
  8. Change the Authentication drop down menu to Password
  9. Enter your username and password and then press OK.
  10. Close the accounts preferences window and say yes to saving it if necessary.

Shaw’s already provided instructions on setting up an account anew for iOS, Android and Blackberry devices: https://wmbeta.shaw.ca/doc/offnet-device-instructions.html

Using Compressor to Make H.264 MP4s

In April I pushed to GitHub my RewraptoMP4 Script I put together to help assist in creating proper MPEG-4 container files while being able to use the x264 QuickTime component in Compressor. Compressor only allows you to specify the codec being used when exporting to a QuickTime file, however it is possible to use QuickTime Player after the fact to convert a QuickTime Movie to an MPEG-4 without transcoding so long as the codecs are supported in the MPEG-4 container spec.

My primary reason for the extra work is that Google Chrome will not recognize a .mov file as a valid wrapper for video in HTML 5’s <video> tags.

Using Compressor

You need to make your Compressor preset using x264 as a normal QuickTime movie preset (use the table below to help with settings if necessary). You’ll then want to grab the script from GitHub and add it as a script to your preset.

Scripting Compressor isn’t very straight forward, while you can use AppleScript or launch a script using Compressor they fail to mention that the script must be saved as an application and the file is accessed by using on open.

Helpful Table of Limitations

DeviceMax ResMax Bit RateH.264 Settings
iPhone640x4802.5 MbpsCan only use Baseline profile Level 3.0 with CAVLC
iPod touch640x4802.5 MbpsCan only use Baseline profile Level 3.0 with CAVLC
iPhone 3G640x4802.5 MbpsCan only use Baseline profile Level 3.0 with CAVLC
iPod touch 2G640x4802.5 MbpsCan only use Baseline profile Level 3.0 with CAVLC
iPhone 3G S640x4802.5 MbpsCan only use Baseline profile Level 3.0 with CAVLC
iPod touch 3G640x4802.5 MbpsCan only use Baseline profile Level 3.0 with CAVLC
iPad1280x720"Unlimited"Can only use up to Main Profile Level 3.1
iPhone 41280x720"Unlimited"Can only use up to Main Profile Level 3.1
iPod touch 4G1280x720"Unlimited"Can only use up to Main Profile Level 3.1
G1480x320600Lack of documentation for anything Android
Droid X1280x720?Lack of documentation for anything Android - can't play more than 24FPS

Android information is rather limited. Official Android information is near non-existent.

Thanks to:

Using HTML 5's Video To Serve Baseline and Main Profile Content

At work I was trying out to see if I could use the new video tag in HTML 5 to show two different versions of the same video; one optimized for devices that accept only the Baseline profile (eg. iPhone 3G S and older, many other phones) and one optimized for larger devices (eg. iPad, iPhone 4 that support the Main profile). Turns out it works absolutely fabulous by using the codecs section in the type (Thanks to Dive into HTML 5 for the documentation).

<video OTHER_ATTRIBUTES_HERE>
    <source src="PATH_TO_MAIN_PROFILE.mp4" type='video/mp4; codecs="avc1.4D401F, mp4a.40.2"' />
    <source src="PATH_TO_BASELINE_PROFILE.mp4" type='video/mp4; codecs="avc1.42E01E, mp4a.40.2"' />
</video>

The video codec for H.264 is: avc1.YYYYXX where YYYY represents the profile, while XX is the level (multiplied by 10 and turned into HEX):

Profile     Value   
Baseline    42E0
Main        4D40
High        6400
Extended    58A0

Level       Hex Value   
3.0         1E
3.1         1F
4.1         29
5.1         33

Now when I visit with an iPhone 3G it loads the baseline version, while my iPhone 4 and iPad both load the Main Profile version. For my current project I use video for whenever Flash isn’t available and it does leave a gap for Firefox and Opera users who don’t have Flash but according to our web stats they don’t actually exist.

It’s also important to note that Android users are also left in a lurch because any version lower than 2.0 doesn’t support <video>, and those that do can’t handle a <source> element having a type value like above. To top it all off it isn’t able to play or show controls on a video on it’s own. You have to add some JavaScript to your page in order to play to pass the click event and tell it to play.

Mail.app, Outlook, Attachments and Disappearing Text

There’s a particularly nasty implementation detail that doesn’t seem to come up often but is just waiting to bite just about every Mac user in the ass. Mail.app allows users to attach files inline allowing them to be part of the flow of the text or in the case of one of my users be right alongside the paragraph talking about the changes in that paragraph. Or like me, right below the email you’re sending and above the replied emails because of Mail.app’s defaulting to top posting. The issue isn’t being able to put attachments inline, but the fact that by default Mail.app will encode the attachment in the same spot in the email file causing other email clients to see the rest of the email as a set of attachments.

The fix: Make sure “Always Insert Attachments at End of Message” is checked off (preference key is AttachAtEnd - boolean for you MCX minded folk) and you can now attach inline as you would normally want to without having Outlook eat your message.

Mail.app.jpg

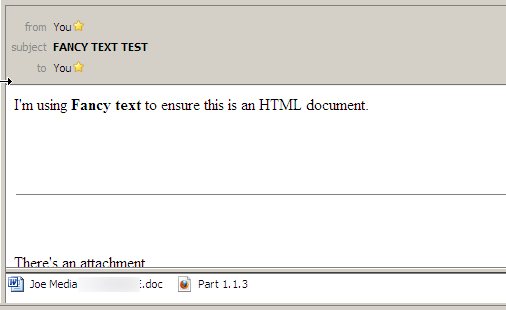
Thunderbird will display the text correctly, but you’ll lose it and it will only appear as an attachment once that email is forwarded or replied to: (Part 1.1.3 is the text “There’s an attachment”). You’ll also notice the horizontal rule separating between the different HTML portions of the email.

Thunderbird.jpg

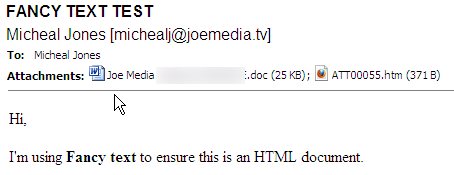
What program completely falls flat on it’s face is Outlook; it just puts all attachments off to the side and you have no idea what’s in the those ATT documents and your client sure as hell isn’t going to read them. So you’ve sent the email, the email was successfully sent, the text will be visible on their webmail systems, on their mobile device (Blackberry or iPhone), and even visible in other mail clients but because it’s technically an attachment Outlook won’t display it inline by default. (For the same reason they won’t show images by default in emails - the cookie tracking and that it’s a great attack vector)

Outlook.jpg

Of note, this only occurs when sending from Mail.app. Outlook can attach items inline and have no issue as it attaches the images at the end of the email.

Correct view:

OutlookCorrect.jpg